 Save
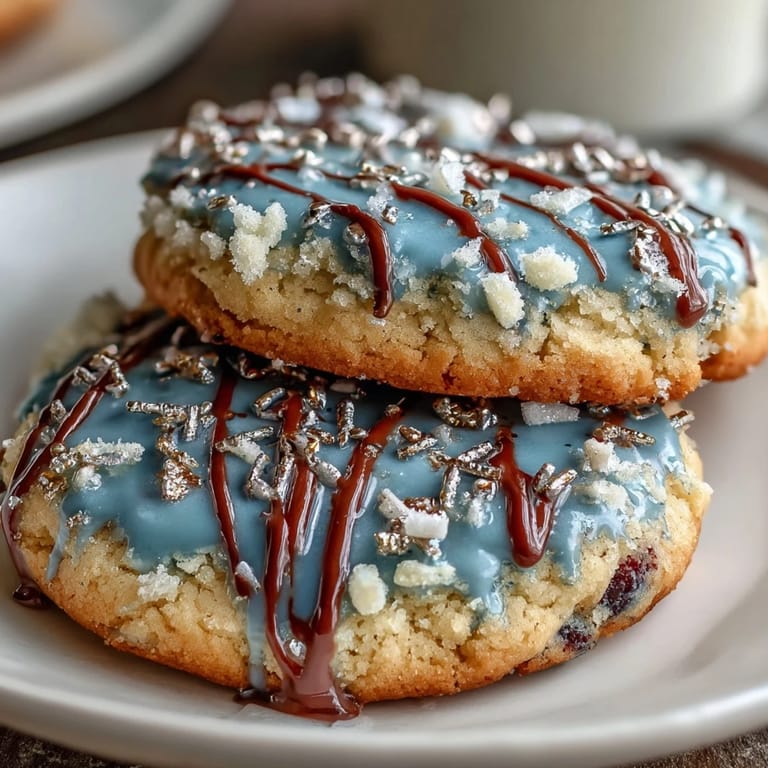
Save My younger cousin showed up at my door with a Cookie Run Kingdom screenshot pulled up on her phone, pointing frantically at Pure Vanilla Cookie's serene expression and asking if I could make them taste as magical as they looked. What started as a casual weekend project turned into an afternoon of laughter, flour dust, and the kind of cookies that made everyone at her birthday party ask for the recipe. These vanilla sugar cookies topped with glossy royal icing capture that same gentle elegance, and honestly, they're easier to pull off than you'd think once you understand the rhythm of it.
I'll never forget pulling the first batch from the oven and realizing the smell of vanilla and butter had completely filled my apartment—my neighbor actually knocked to ask what I was making. We ended up sitting on my kitchen counter with warm cookies and blue-tinted icing, and something shifted that day about what felt possible in a home kitchen. These cookies became the thing I made for every occasion after that, from cookie exchanges to just because moments.
Ingredients
- All-purpose flour (2 1/2 cups): This is your structural foundation, and measuring it by weight keeps your dough consistent every single time.
- Baking powder (1/2 tsp): Just enough lift to make the cookies tender without puffing them up like cake.
- Salt (1/4 tsp): Acts as a flavor amplifier that makes the vanilla sing instead of whisper.
- Unsalted butter (3/4 cup), softened: Softness matters here—cold butter won't cream properly with the sugar, so pull it out an hour before you start.
- Granulated sugar (1 cup): Creates the texture and structure that lets your cookies hold their shape through decorating.
- Egg (1 large): Binds everything while adding moisture that keeps the cookies tender through shipping or storing.
- Pure vanilla extract (2 tsp): Use the real thing—imitation won't give you that haunting floral note that makes people close their eyes.
- Milk (1 tbsp): Loosens the dough just enough so it rolls smoothly without cracking at the edges.
- Powdered sugar (2 cups), sifted: Sifting prevents lumps that'll catch in your piping tips and ruin the flow.
- Meringue powder (2 tbsp): This is the secret to royal icing that actually hardens glossy and smooth, not chalky.
- Warm water (4-5 tbsp): Start conservative—you can always add more, but watery icing can't be fixed.
- Gel food coloring: Gel doesn't thin your icing like liquid food coloring does, so your colors stay vivid without adjusting consistency.
Tired of Takeout? 🥡
Get 10 meals you can make faster than delivery arrives. Seriously.
One email. No spam. Unsubscribe anytime.
Instructions
- Combine your dry ingredients:
- Whisk the flour, baking powder, and salt together in a medium bowl and set it aside. This pre-mixing ensures the leavening gets evenly distributed so every cookie bakes the same way.
- Cream butter and sugar until fluffy:
- Beat softened butter and granulated sugar together for about 2 to 3 minutes until it looks pale and airy—this is where you're building in the lightness that makes cookies tender. You'll hear the mixer slow down slightly as it incorporates air, and that's exactly what you want.
- Add moisture and vanilla:
- Mix in the egg, vanilla extract, and milk until everything is combined and the mixture looks slightly glossy. Don't overmix at this stage or you'll develop gluten and end up with tough cookies.
- Bring the dough together:
- Gradually add your dry ingredients to the wet mixture, mixing just until the dough comes together—you're looking for no visible streaks of flour, nothing more. Overmixing is the enemy here.
- Chill your dough:
- Divide the dough in half, flatten each into a disk about an inch thick, wrap in plastic wrap, and refrigerate for at least 1 hour. This stops the dough from spreading too much in the oven and gives you cleaner cookie shapes.
- Preheat and prepare:
- Heat your oven to 350°F and line your baking sheets with parchment paper. This temperature is gentle enough to bake cookies through without burning the bottoms.
- Roll and cut:
- On a lightly floured surface, roll your dough to about 1/4-inch thickness and cut with your favorite shapes. The parchment paper trick here is laying it underneath your rolling pin—it keeps the whole process from getting sticky.
- Space and bake:
- Place cookies 1 inch apart on your baking sheets and bake for 10 to 12 minutes until the edges just barely start turning golden. They'll continue cooking on the hot pan, so don't wait until they're fully brown or they'll harden too much.
- Cool properly:
- Let them sit on the baking sheet for 5 minutes to set slightly, then transfer to a wire rack to cool completely. This prevents the bottoms from steaming and getting soggy.
- Make your royal icing:
- Combine sifted powdered sugar, meringue powder, vanilla, and 4 tablespoons of warm water in a large bowl. Beat on low speed with an electric mixer until it's smooth and glossy, adding water 1 teaspoon at a time if needed to reach spreading consistency—you want something that flows but holds its shape.
- Tint and decorate:
- Divide your icing into bowls and add gel coloring drop by drop until you reach your desired shades. Use piping bags or squeeze bottles to decorate your completely cooled cookies, working in whatever patterns feel right to you.
- Let it set:
- Allow the icing to set completely (usually 2 to 4 hours depending on humidity) before stacking or storing. Hard royal icing is what makes these cookies so special for gifting.
 Save
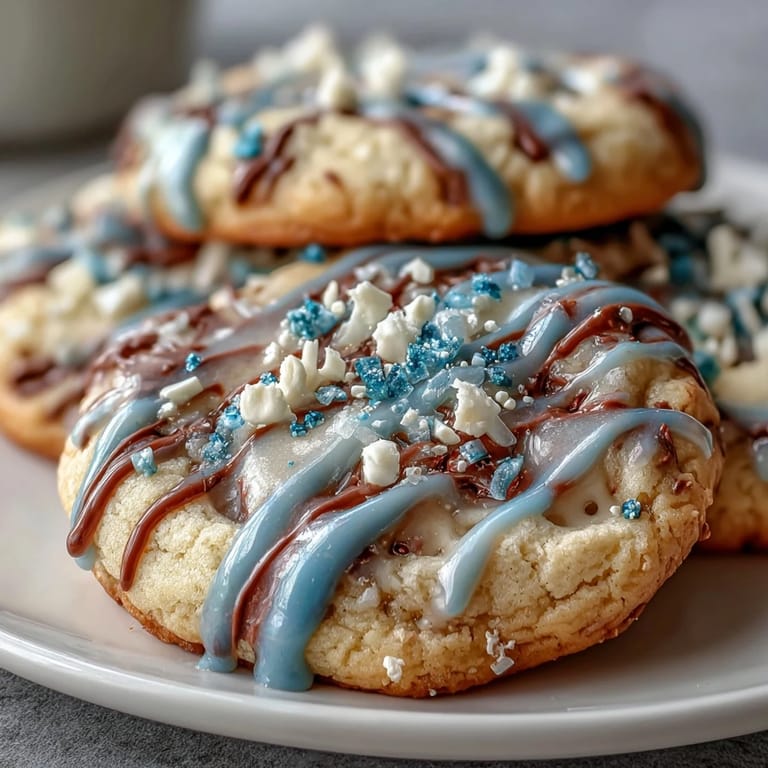
Save There's something almost meditative about piping the final details onto these cookies, watching each one transform from plain vanilla wafer into something that feels like a gift. My kitchen got quieter around that part of the process, like the cookies were asking me to slow down and actually pay attention to what my hands were doing.
The Pure Vanilla Cookie Decorating Strategy
If you're going for the Pure Vanilla Cookie theme specifically, you'll want to think about blue as your dominant color with white details and touches of gold or pale yellow to mimic the character's serene color palette. The beauty of royal icing is that you can pipe fine lines for details, flood larger areas with a thinner consistency, or create almost architectural patterns if you're in the mood for precision. Start with your darkest colors first so you can layer lighter shades on top without them bleeding through.
Storage and Gifting
These cookies stay perfect in an airtight container at room temperature for up to a week, which makes them ideal for baking ahead before parties or packing into gift boxes. The hardened royal icing actually protects the cookie underneath, so they travel beautifully and arrive looking exactly as decorated.
Customization and Timing Notes
You can absolutely make this dough a day ahead and bake it fresh the morning of whatever occasion you're preparing for—the dough actually improves slightly as the flavors meld overnight. The whole project from start to finished decorated cookies takes about an hour if you're working with pre-chilled dough, or closer to three if you're starting completely from scratch with time for setting.
- Room temperature butter is non-negotiable—it needs to be soft enough to leave an indentation when you press it.
- If your royal icing is too thick, add water one tiny teaspoon at a time rather than pouring; too thin and it'll slide right off.
- Fully cooled cookies are essential—warm cookies will cause the icing to melt and slide.
 Save
Save These cookies taste like vanilla and butter and care, which is probably why people ask for them again and again. Make them for someone and watch what happens—the answer will probably surprise you.
Questions & Answers
- → Can I prepare the dough ahead of time?
Yes, chilling the dough for at least one hour helps it firm up and makes it easier to roll and cut shapes.
- → What is royal icing made from?
Royal icing consists of powdered sugar, meringue powder, vanilla extract, and water, whipped to a smooth glossy texture that hardens upon drying.
- → How do I achieve vibrant icing colors?
Using gel food coloring rather than liquid ensures bright, vivid colors without altering icing consistency.
- → How long do decorated cookies stay fresh?
When stored in an airtight container at room temperature, they remain fresh for up to one week.
- → Can these cookies be stacked after decorating?
Yes, the hardened royal icing creates a firm surface, allowing cookies to be safely stacked without damage.
- → Are there any common allergens in these cookies?
These include wheat (gluten), eggs, and dairy. Always check for cross-contamination if allergies are a concern.